
It’s great that iPhone can do lots and great things — and I don’t mean multitasking, folders and the such. I mean real, good and geeky things. Like, for example, accessing your computer remotely via Wifi, EDGE, 3G or even GPRS and making it just like you were in front of your monitor using your keyboard and mouse. Believe me, it works.
[This how-to is for Mac computers. If you have a Windows one, click here and follow (almost) the same steps as described. It won’t be a problem. You can always check this and the iTeleport Windows how-to for any help you might need or anything else.]
All you need is to download buy the iTeleport app. It costs $24.99 but it sure does worth it. iTeleport is available on the iPad with the same price, too. After you downloaded it, follow these – really – easy steps to setup iTeleport and start using it.
Step 1: Setup Screen sharing
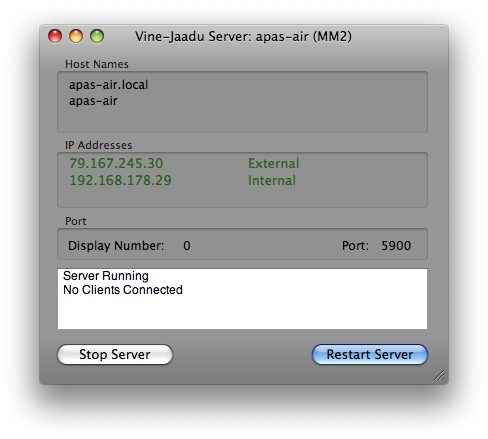
First you have to disable Screen Sharing or Apple Remote Desktop — if they’re enabled at all. Then, download the Vine-Jaadu Server application and run it. Enter a secure server password, make sure it says “Server running” and leave it running on the background.
Step 2: Install & setup Jaadu VNC Connect
Basically, Jaadu VNC Connect is a utility that runs on your Mac and autoconfigures port forwarding, dynamic DNS settings and also publishes your connection information over the local network so that iTeleport can auto-discover your computer. Download the app from the official site after accepting the licence — or if you prefer, here’s the direct link.
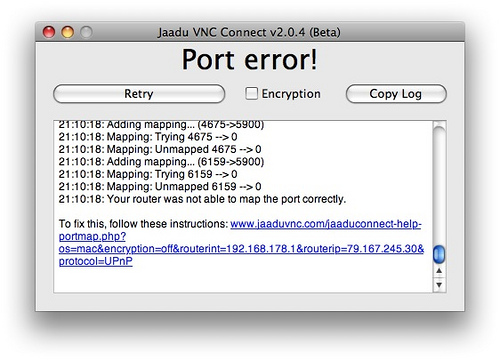
Well, sometimes it just doesn’t work. Here’s an other (official) workaround to setup correctly all the required settings. This the way I did it. First, your iPhone needs to know how to reach your router and then your router needs to know how to reach your computer. That’s why we have to use no-ip.com (for to teach the iPhone how to reach) and setup a little of port-forwarding on our router (for to teach the router how to handle the iPhone request).
Step 3: The other way [follow this only if VNC Connect didn’t work for you]
Visit no-ip.com and create a free account (it’s just under the login form). After you are a member of no-ip and logged in click on the “Add a Host”. This tool helps you by keeping track of your router’s external IP address no matter how often it changes — aka make the computer visible always on the iPhone.
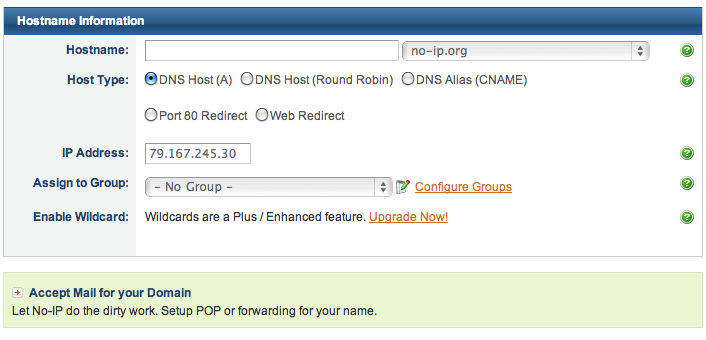
Just select a nickname for your computer — something like a username and then select a domain from the drop-down menu. I did select no-ip.org, simply because I think that the other names suck. Leave the other settings as they are and click “Create Host”. Download the DUC client. Now, simply add your no-ip account details, click refresh host and just tick the checkbox next to your hostname. That was it.
Now you’ve solved the first challenge — no matter what network you’re on, you can always connect to your router by entering your xyz.no-ip.org (or the domain you entered) address in Jaadu.
You have to port-forward now. The purpose of port forwarding is to take an incoming request from the external side (Internet) and forward that request to an internal computer in the network. You need to tell your router to forward port 5900 to your VNC server. If you do not know how, No-ip.com has guides for the other major routers and so does portforwarding.com.
Here’s what you need to set:
- Internal / Private IP of your computer: [*Your IP address]
- Port to forward from / Private TCP Port: 5900
- Port to forward to / Public TCP Port: 5900
- Leave any UDP ports blank
Finally, visit Can You See Me and type in your forwarded port (5900). See whether it is able to connect or not. If so, then you should be good to go. If not, then your router isn’t correctly forwarding to your VNC server. (This problem is unrelated to no-ip.com.)
Step 4: Configuring iTeleport on the iPhone
After all these settings and configurations you are now, finally, able to click on the iTeleport app and connect to your computer.
But before this, just a tip. It’s better to set-up two “computer remote profiles” for your machine. One to work for your home/work Wifi and the other to work as the real remote one, like connecting from 3G or from a hotel or something. In the first you can set-up the really good (and fast) settings like the best color, the best mouse response, the best refresh rate, etc. On the later, you can set-up a really good and not so heavy on network demands profile for better remote access.
So, for the first profile, let’s call it “your-machine’s-name home”, you just have to run the app and click on the “Discovered” app. Hopefully, your computer will appear there just because you’re iPhone and you’re computer are on the same network. At least, that worked for me but I think it won’t be a problem. Now, click on the blue arrow icon and set a name for this profile, through the Security menu enter your password you typed in Step 1. Finally, because this is the home/work profile as I said, click on Advanced and chose for Colors “Server Decideds” and for the Refresh rate “Fast Refresh”. Also switch the Touchscreen Mode and Invert Mouse from “Off” to “On” as well as Cursor Momentum from “On” to “Off”.
You’re good to click “Connect” now and enjoy.
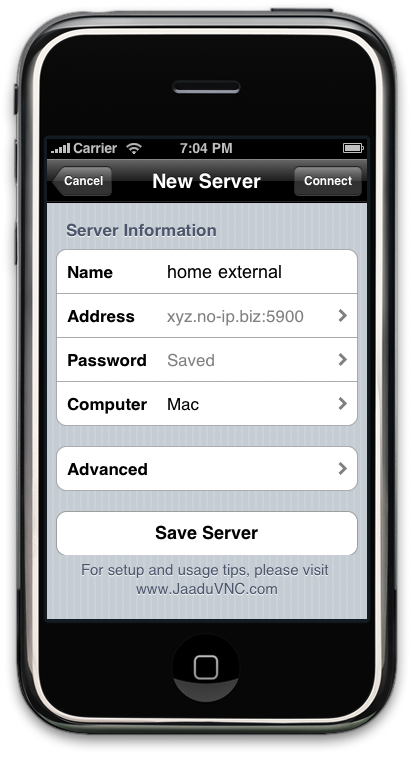
But! Before that you have to manually enter the profile settings for the second profile the “real” remote one. Go to the main menu of iTeleport and click on “Manual”. Click on the “+” icon, set the name to, let’s say “you-machine’s-name remote”. Below that, enter your hostname for address (your-machine’s-name.no-ip.org — or whatever you chose) and, as previously, the VNC password you typed in Step 1. To test this you have to be on a different network (Wifi). Either disable WiFi and use 3G/EDGE, or use a different WiFi network.
Recap
By now you should have two separate saved servers. One will be used for external access (when you are on 3G or EDGE, or on a different WiFi network). It will not work when you are on the same WiFi network as your computer. The other one will be used for internal access. It will only work when you are on the same WiFi network as your computer.
Back to Step 2
If Jaadu VNC Connect did work for you, in order to connect to your computer you simply have to follow the steps in the “Discovered” tab (the home/work profile in which iTeleport finds automatically your computer). Basically it’s same procedure.
Final words
You’re good to remote access your machine now. Remember! The Vine Server app has to run in order to remote access, so do not quit it. I made it to run on-startup and always be on the dock.
I hope you enjoyed this how-to workthrough for iTeleport. If you have any questions, problems or just want to drop a few words feel free to write a comment!
Oh, and by the way here’s the final result. The first photo is with the home/work profile (all the good settings) and the second one is the “remote” profile with the not-heavy-on-network-resources settings. I chose to screenshot my Air’s background so that you can feel the difference.

It’s just looks expensive compared to free alternatives out there.
I’m using Teamviewer since it was released and it’s awesome, not costing a dime for personal use.
There is also a RealVNC iPhone app that i hasn’t tested yet, or even Mocha VNC Lite that is free too. ;-)
Thanks for the info HitMan. Well, it happened for to have a promo code for iTeleport. But I’ll sure test TeamViewer, as I saw it it’s very cool app too. I’ve heard also about RealVNC and Mocha VNC apps, but not the best kind of words, so, I guess I’ll stick with iTeleport and TeamViewer.
Port forwarding or port scan be be done at :
http://www.portcheckers.com